Pages

Sunday, July 26, 2015

Newborn Shadowbox

I have started going through Audrey's clothes that don't fit her and can't help but feel a little sad. As rough as it has been for the past 6.5 months, I have really enjoyed all of the little developmental phases  with my little girl and it saddens me that this might be the only time I experience them. Don't get me wrong, I am super excited about the days, weeks, months, and years ahead to watch her grow into this new person. It just feels so permanent, and I wanted to at least keep her newborn outfit as a rememberance of our early days together and will be something we all can cherish. 
With this in mind,I decided to make a Shadowbox. It's a cheap, simple way to organize everything and you really don't need many materials. I'm sure most of you will have them lying around especially if you're an avid crafter. 
So first thing you need to do is collect all of the items you would like to display so you have an idea of the size you will need. 
Once you figure that out, you can purchase a Shadowbox from any craft store. The big box stores usually have pretty decent sales, I got mine from michaels for 50 percent off, and ended up paying about ten bucks. 
My box is 12x12, so I picked up a few sheets of scrapbook paper I thought might look good. 
Other materials you will need:
Scissors 
Push pins
Tape
Glue
Stickers
Card stock or scrapbook paper ( use to make borders for photos)
First thing I did was take the paper insert that came with the frame and taped it to the backboard of the box. 
I then glued the scrapbook paper to the paper insert
The next step is to organize everything in a way that you like. 
If you have any photos, you can cut a piece of scrapbook paper or card stock to outline them. I like to do this because it really makes them stand out.
I glued my photos to the backboard after I added the border. 
Push pins were used to affix any clothing to the backboard. You can apply them to the inside of the sleeves and torso to hide them :)
Next, I used a little tape rolled up to affix the ankle bands she wore in the hospital. Unfortunately we were in such a rush to go home that I forgot to take the hospital card that was in he bassinet :( 

Add your child's name to it, and VoilĂ ! The skies the limit to how you want to personalize your Shadowbox, and you have something unique to display for the world to see. This project took me maybe 10 minutes to put together, perfect to work on while your little one is napping!

Sunday, October 5, 2014

Annie Sloan Chalk Paint and Wax

I'm almost 26 weeks along and I get exhausted more easily which makes getting projects done around the house quite difficult. Not only that, but it is fall and we still have to keep up with yard work on top of the projects we are trying to get done before our daughter makes her way into the world in about 3 months!

I completed putting the furniture for the nursery together from Ikea. The next thing I had to do was figure out what I wanted to do to it. I loooove working with chalk paint and wanted to incorporate that into what I was doing. I have also liked the look of using a dark stain on the top from a lot of pieces I've seen at the antique coop in our area. As soon as we found out we were having a girl, I had a much better idea of what I wanted to do, and I am in love with it. This chica is going to have the best room and furniture than any other room in the house!

As you may recall, the furniture I purchased is plain pine, no sanding, no prep work. Awesome!

Step 1: Apply Stain. I decided to try out miniwax's polyshades, which has the polyurethane incorporated. They claim that it is one step, but depending on how dark you want your piece, I suggest at least applying 2 coats. You must wait at least 6 hours between coats. I let the second coat dry before moving onto the next step.


Step 2: Tape over edges with stain using painters tape.

Step 3: Use a natural bristled brush to apply shade of chalk paint. I decided instead of mixing my own chalk paint, I would try annie sloan's chalk paint. It is much more user friendly ( you don't have to continually mix as you are applying, which saves time), but, it is a little more costly. For a quart I spend thirty dollars buuut, I only used half a can on 3 pieces of furniture and applied 2 coats. Well worth the money. After applying the last coat, I let sit over night just because I was exhausted but it does dry pretty quickly.

Step 4: Distress if you want. If you are happy with the results, just leave it!

Step 5: Apply the wax. I decided to try using annie sloan clear soft wax. The nice thing about annie sloan products is that they are all baby friendly. This makes me a little more comfortable using them over latex paints.

Step 6: Apply selected hardware. There are so many different kinds of hardware for furniture now to choose from. I think I spend about a half an hour looking at knobs at hobby lobby and I got a great deal on them!

Of course I have to instill my love of Paris on my daughter =)


For the chest, I chose these brass knobs shaped like flowers with a little bling in the center of them.


All in all I am very pleased with how everything turned out. 
Although the Annie Sloan chalk paint was a little expensive, it was easy to work with, the color is vibrant, and a little goes a long way.
I loved using the Annie Sloan wax. It's very soft and just as with the paint, a little goes a long way. I highly recommend both products and will be using them for any future refinishing projects. 

The big stuff in the nursery is all taken care of for the most part, Just need to figure out wall decor and pick out window fixtures and we are good to go =)


Sunday, September 7, 2014

Sunday Morning

So this has been officially my first weekend working on the nursery. Joshua started with the heavy duty work, and I spent most of Saturday painting the ceiling and working on finishing touches around the edges and repainting the floor molding.
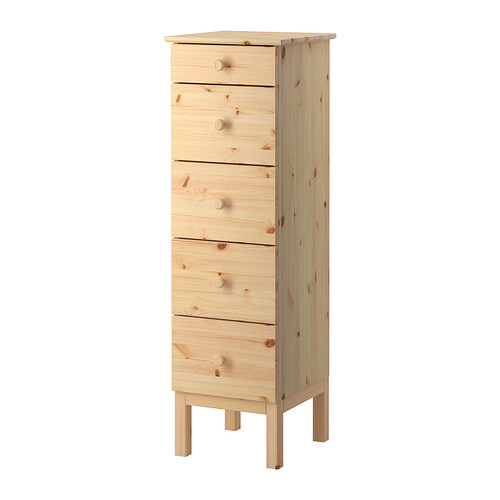
My next big step is assembling the furniture which I brought home from Ikea. The big mistake I made last night was putting together the nightstand at 9pm when I was utterly exhausted from painting for the better half of the day. It took me much longer than expected and there was an unexpected amount of hardware to put this tiny thing together. It took me about an hour which had me dreading putting together the rest of the furniture..The changing tablet didn't have as many pieces and maybe took me, at most, a half hour to assemble. The next one I thought I would tackle was the 5 drawer chest.
Those of you who are not familiar with Ikea, they sure know how to package their furniture well:

The first task is actually finding the instruction manual..to do that, you have to take eeeeeverything out of the box.
Look at all this hardware! 
Finally! The instructions to put this thing together..

After 2 hours, I have a finished piece of furniture for the nursery =) Only one more to go! 


I love Ikea!

I have been on quite the vacation from my blog not because I haven't been wanting to do any improvements anymore, but because I simply have not been able to, and for good reason too. My husband and I are expecting our first child on January 13th!
It has been a long and emotional journey for the both of us and I am so happy that we are finally able to experience the joys of parenthood.
Now that the morning sickness has tapered off and I have some of my energy back, at 5 months we figured we should start cracking on the nursery.
Last week I went to New Jersey for a few days to visit my mom and my sister..being that I drive roughly 6 hours to get there (this is without the numerous stops I had to take due to the little one dancing on my bladder), I figured I should probably do this before I look like a house and won't be able to make the drive. We decided to make a trip to one of my favorite stores to go on a shopping spree for the nursery, especially since the closest one is either in Toronto or New Jersey. Boo!


I would have loved to purchase more, unfortunately my Hyundai accent can only fit so much. I ended up leaving the store with the following pieces of furniture:

1.) Tarva Nightstand

2.) Tarva 5 Drawer Chest


3.) Tarva 3 Drawer Chest

4.) Sniglar Changing Table


I just love this collection because they are super affordable, and it's a blank canvas to work with. I was trying to look at craigslist and in thrift stores for old pieces of furniture that are cheap to refinish but there was nothing decent or cheap and crucial pieces were missing...This is also quality furniture, real pine, hefty hardware, much better quality than new furniture you would buy at the big box stores. I can attest to this because of the amount of time that I have spent putting this furniture together on my weekend off..
Grandma Evans also has been contributing to the nursery...she picked up the tab on a super cute rug, a mouse nightlight that changes colors, a blanket, and some organizing boxes as well as the major component, the crib.

When I returned from NJ, (which I was only gone for 5 days), my dear husband decided to surprise me with repainting the nursery and adding in chair rail, decorative wainscoting, and a new shelf =)
Those of you who remember, we had an extra room which I was making into my office space and is where I kept my menagerie.
Before:


Aaaand this is what I returned home to!

He did such an awesome job and I'm just so happy that this is one less thing I have to do!


Sunday, April 20, 2014

My Kingdom for a Shower

Happy Easter everyone! What did we decide to do this weekend? Since I had a half day of work on Friday, we decided to tear out the rest of the tile in the shower area and install our insert since it is at least a 3 day project and we have only one shower. We did purchase a mirror and new lights to go over the sink and actually did paint an accent wall, but I'll write about that in my next post.

 Day 1: (start around 1 pm)
Pull out the tile. More like take a huge mallet and repeatedly take out our frustrations on the wall. Why? If you are one of those lucky ones that purchased an older house, they didn't have the light stuff we call drywall or wonderboard.


 If you remove the tile, you'll notice a cement wall which when you start knocking it out, is 3/4 of an inch, which doesn't seem like that much, but add into that the mesh backing holding it in place against the wall. That pretty much took the rest of the afternoon to remove.
What we couldn't fit in our toter for pickup this week is sitting in boxes in our kitchen and will have to be disposed of over the next few weeks. Joy.


Day 2: Joshua is at work in the morning.
I finish straightening out the edges, pulling out nails and the rest of the mesh that didn't want to come out to get a smooth surface. Clean out debris in tub and on floor.
After hubby gets home, we go get wonderboard which is a nonorganic backer board that does not grow bacteria or mold. Another plus is that it is super light and easy to transport in the back of a pickup truck =)
The first thing we do is put up a plastic vapor layer, which is attached to the wood beams with a staple gun.

The rest of the day is spent measuring and cutting this stuff, which is not fun. As soon as you cut it with a box cutter, the material inside just spills all over the place. It looks like a mix of sand and little Styrofoam balls. I am so glad I decided to clean the living room the day prior.
Last task of the day is putting up the Wonderboard. Thank goodness!


Day 3: Easter
Get up early and head out to Lowes to pick up some caulk and look for adhesive tiles for a back-splash above the liner. They only had two which were awful, and ended up going to not one but two home depots because we were told they had them, which they did not. Luckily for us, one of their associates gave us a demo on how to put up the tile, showed us the materials to use, which was awesome-sauce. This guy definitely deserves a raise.
The first thing we do is apply this stuff called red guard. It is quite expensive (50 bucks a gallon), but it creates another vapor layer which if you are going to do things right, you want to make sure you use this stuff in areas that are going to have a lot of moisture. It looks like melted pink peeps, and is pretty much the same consistency but smells like that store bought boxed hair dye. Make sure you open up the windows when you are applying it.


We were told that it needs about 20 minutes to dry, but it is still a little cold out today so we let it set for about an hour before doing anything else. It goes on pink and turns red when it's dry.
Next step is to place the pieces of the liner and outline them exactly where we want them to be. We used a level to make sure the liner was level to the tub.
We attempted and failed at using this special adhesive for the tub liner. It was way to thick to work with and was a pain. We ended up using the liquid nails tub adhesive which was easy to work with and were able to get the rest of the liners up in minutes ( this was after wasting a large amount of time with the other stuff).
After each panel was carefully applied to the Wonderboard, we used duck tape to hold the panels in place as per manufacturer instructions. This will need to dry for a period of 24 hours.


There is not enough time to apply the tile this weekend and take a shower, so we are gonna opt with stopping at the point.  Next house we get is going to have 2 bathrooms so that this does not happen again. That's all I'm sayin! So the lesson for the day:
Use this:


NOT THIS!